🚀 Supercharge Your GitHub Repo with AI in Just 5 Minutes!
ESClusive AI for GitHub Repo bridges that gap by creating a smart knowledge base from your codebase that ANY AI can understand - no complicated setup, no expensive API tokens, just pure magic! ✨
🎯 What You’ll Get
A single knowledge base file that captures the essence of your codebase
The ability to drag-and-drop this file into ANY AI chat (Claude, ChatGPT, etc.)
AI responses that actually understand your project patterns and architecture
Zero ongoing costs or complex configurations
🛠️ Setup in 3 Simple Steps
Step 1: Create the GitHub Action Workflow
Create a file at .github/workflows/run_esclusive_ai_for_github_repo.yml in your repository with this content:
run_esclusive_ai_for_github_repo.yml
 1# Comprehensive Github Action yml reference: https://docs.github.com/en/free-pro-team@latest/actions/reference/workflow-syntax-for-github-actions
 2name: run_esclusive_ai_for_github_repo
 3
 4# Choose when workflow Run: https://docs.github.com/en/actions/writing-workflows/choosing-when-your-workflow-runs/triggering-a-workflow
 5# Event trigger definition examples: https://docs.github.com/en/actions/writing-workflows/workflow-syntax-for-github-actions#on
 6on:
 7#  push: # any push (commit) event to master main trigger this
 8#    branches: ["main"]
 9#  pull_request: # any merged pull request to main will trigger this
10#    branches: ["main"]
11  workflow_dispatch: # allows you to manually trigger run job from the UI
12
13permissions:
14  contents: write # need this permission to publish knowledge base to GitHub Release
15
16jobs:
17  run_esclusive_repo_ai:
18    # Specify the version of ESClusive AI for GitHub Repo by: [email protected], e.g. 0.1.1
19    # where X.Y.Z is from our GitHub Release: https://github.com/easyscalecloud/esclusive-ai-for-github-repo/releases
20    uses: easyscalecloud/esclusive-ai-for-github-repo/.github/workflows/run.yml@main
Step 2: Create Your Configuration File
Create a file at .github/workflows/esclusive_ai_for_github_repo_config.json with this content:
{
    "document_groups": [
        {
            "name": "all",
            "include": [
                "**/*.py",
                "**/*.js",
                "**/*.ts",
                "**/*.md",
                "**/*.rst"
            ],
            "exclude": [
                ".venv",
                ".git",
                "node_modules"
            ]
        }
    ]
}
Customize the include and exclude patterns to select exactly which files should be part of each knowledge base file. To learn about the include / exlucde pattern syntax, refer to the Include-Exclude Pattern Matching Guide.
Tip
Each “document_group” you define becomes a separate downloadable knowledge base file! You can create multiple document groups with different file selections to organize your knowledge base by file types, components, or any way that makes sense for your project.
Important
The location and filename .github/workflows/esclusive_ai_for_github_repo_config.json must be exactly as specified. The automation source code in the main.py file specifically looks for this path and filename to locate the configuration.
Step 3: Run the Action & Download Your Knowledge Base
Go to your GitHub repository
Click on the “Actions” tab
Select the
run_esclusive_ai_for_github_repoworkflowClick the “Run workflow” button
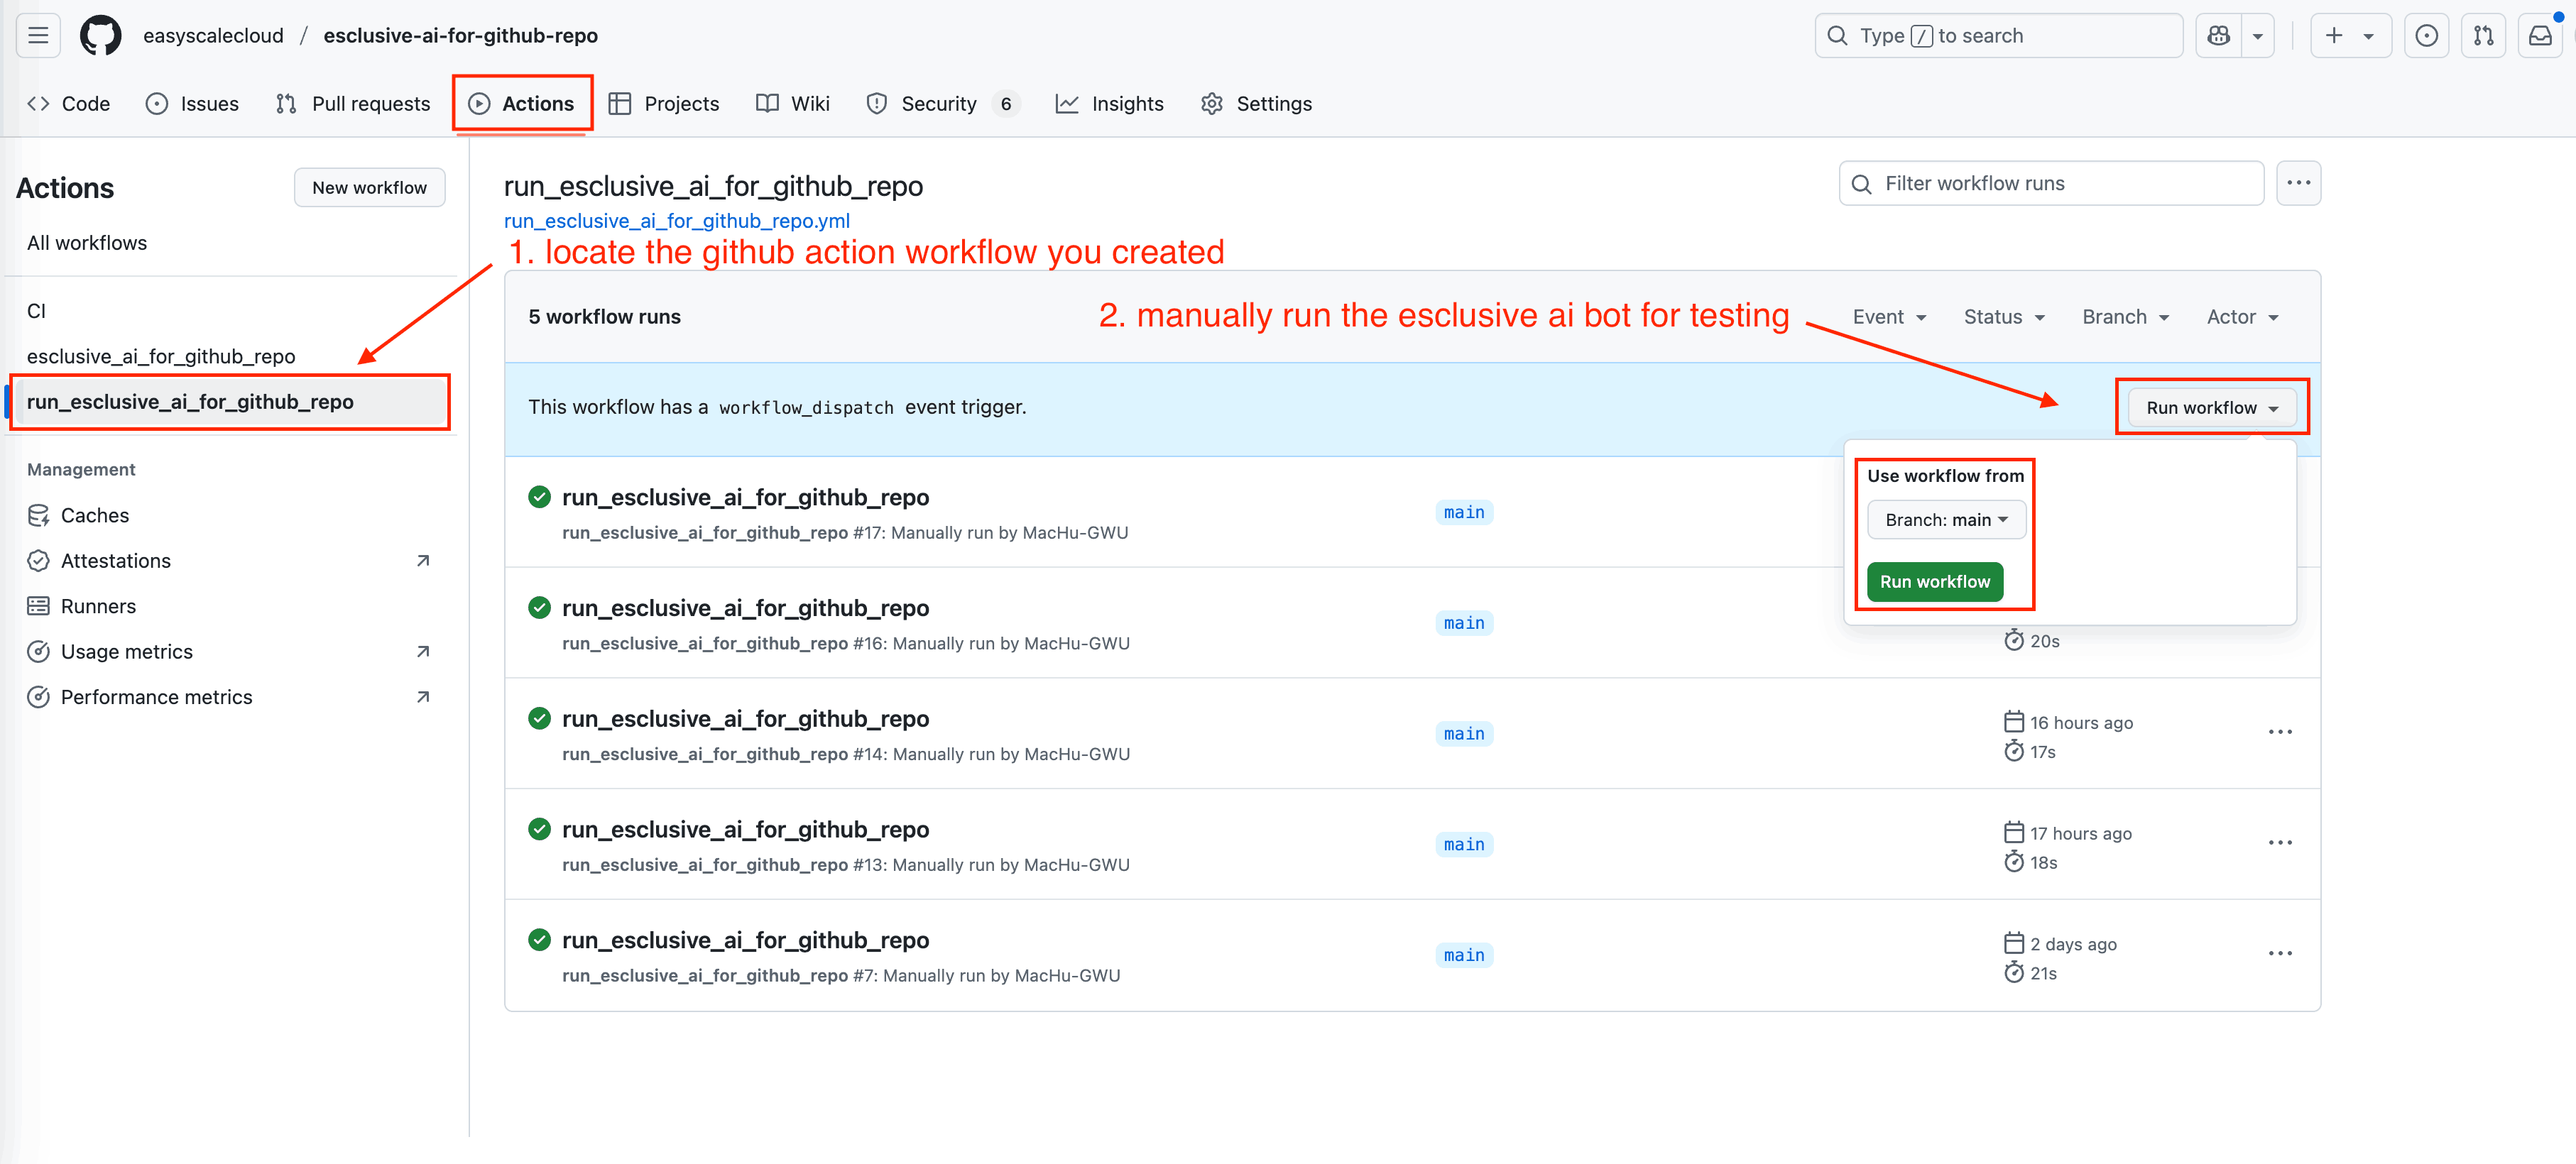
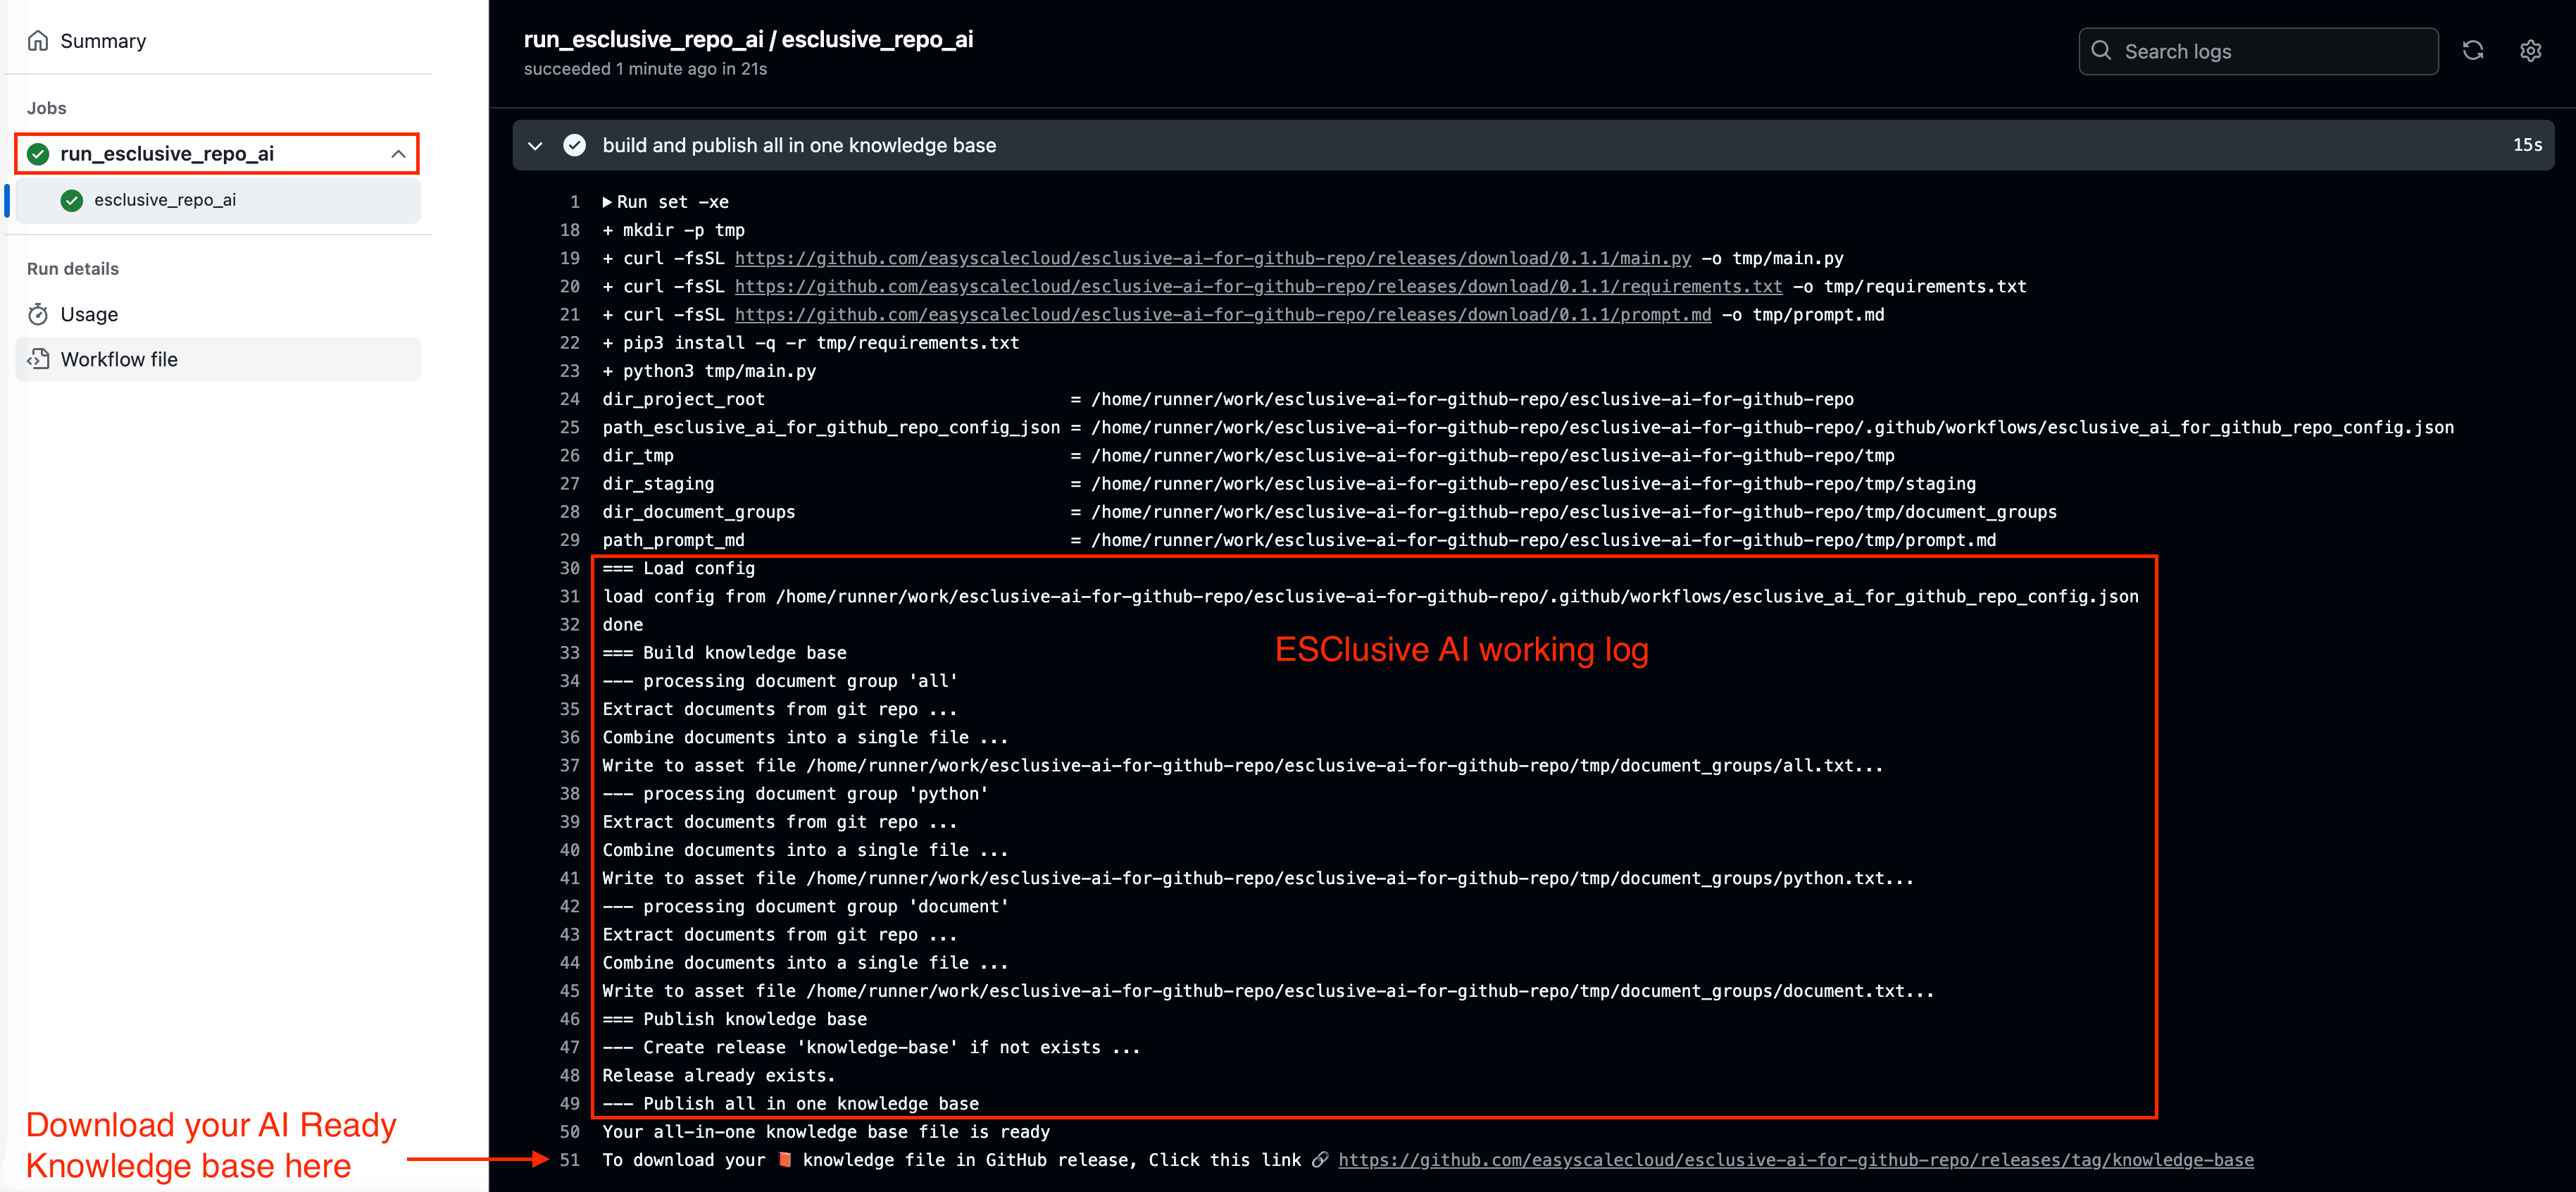
Wait a few seconds (usually 15 ~ 25 for processing) to complete
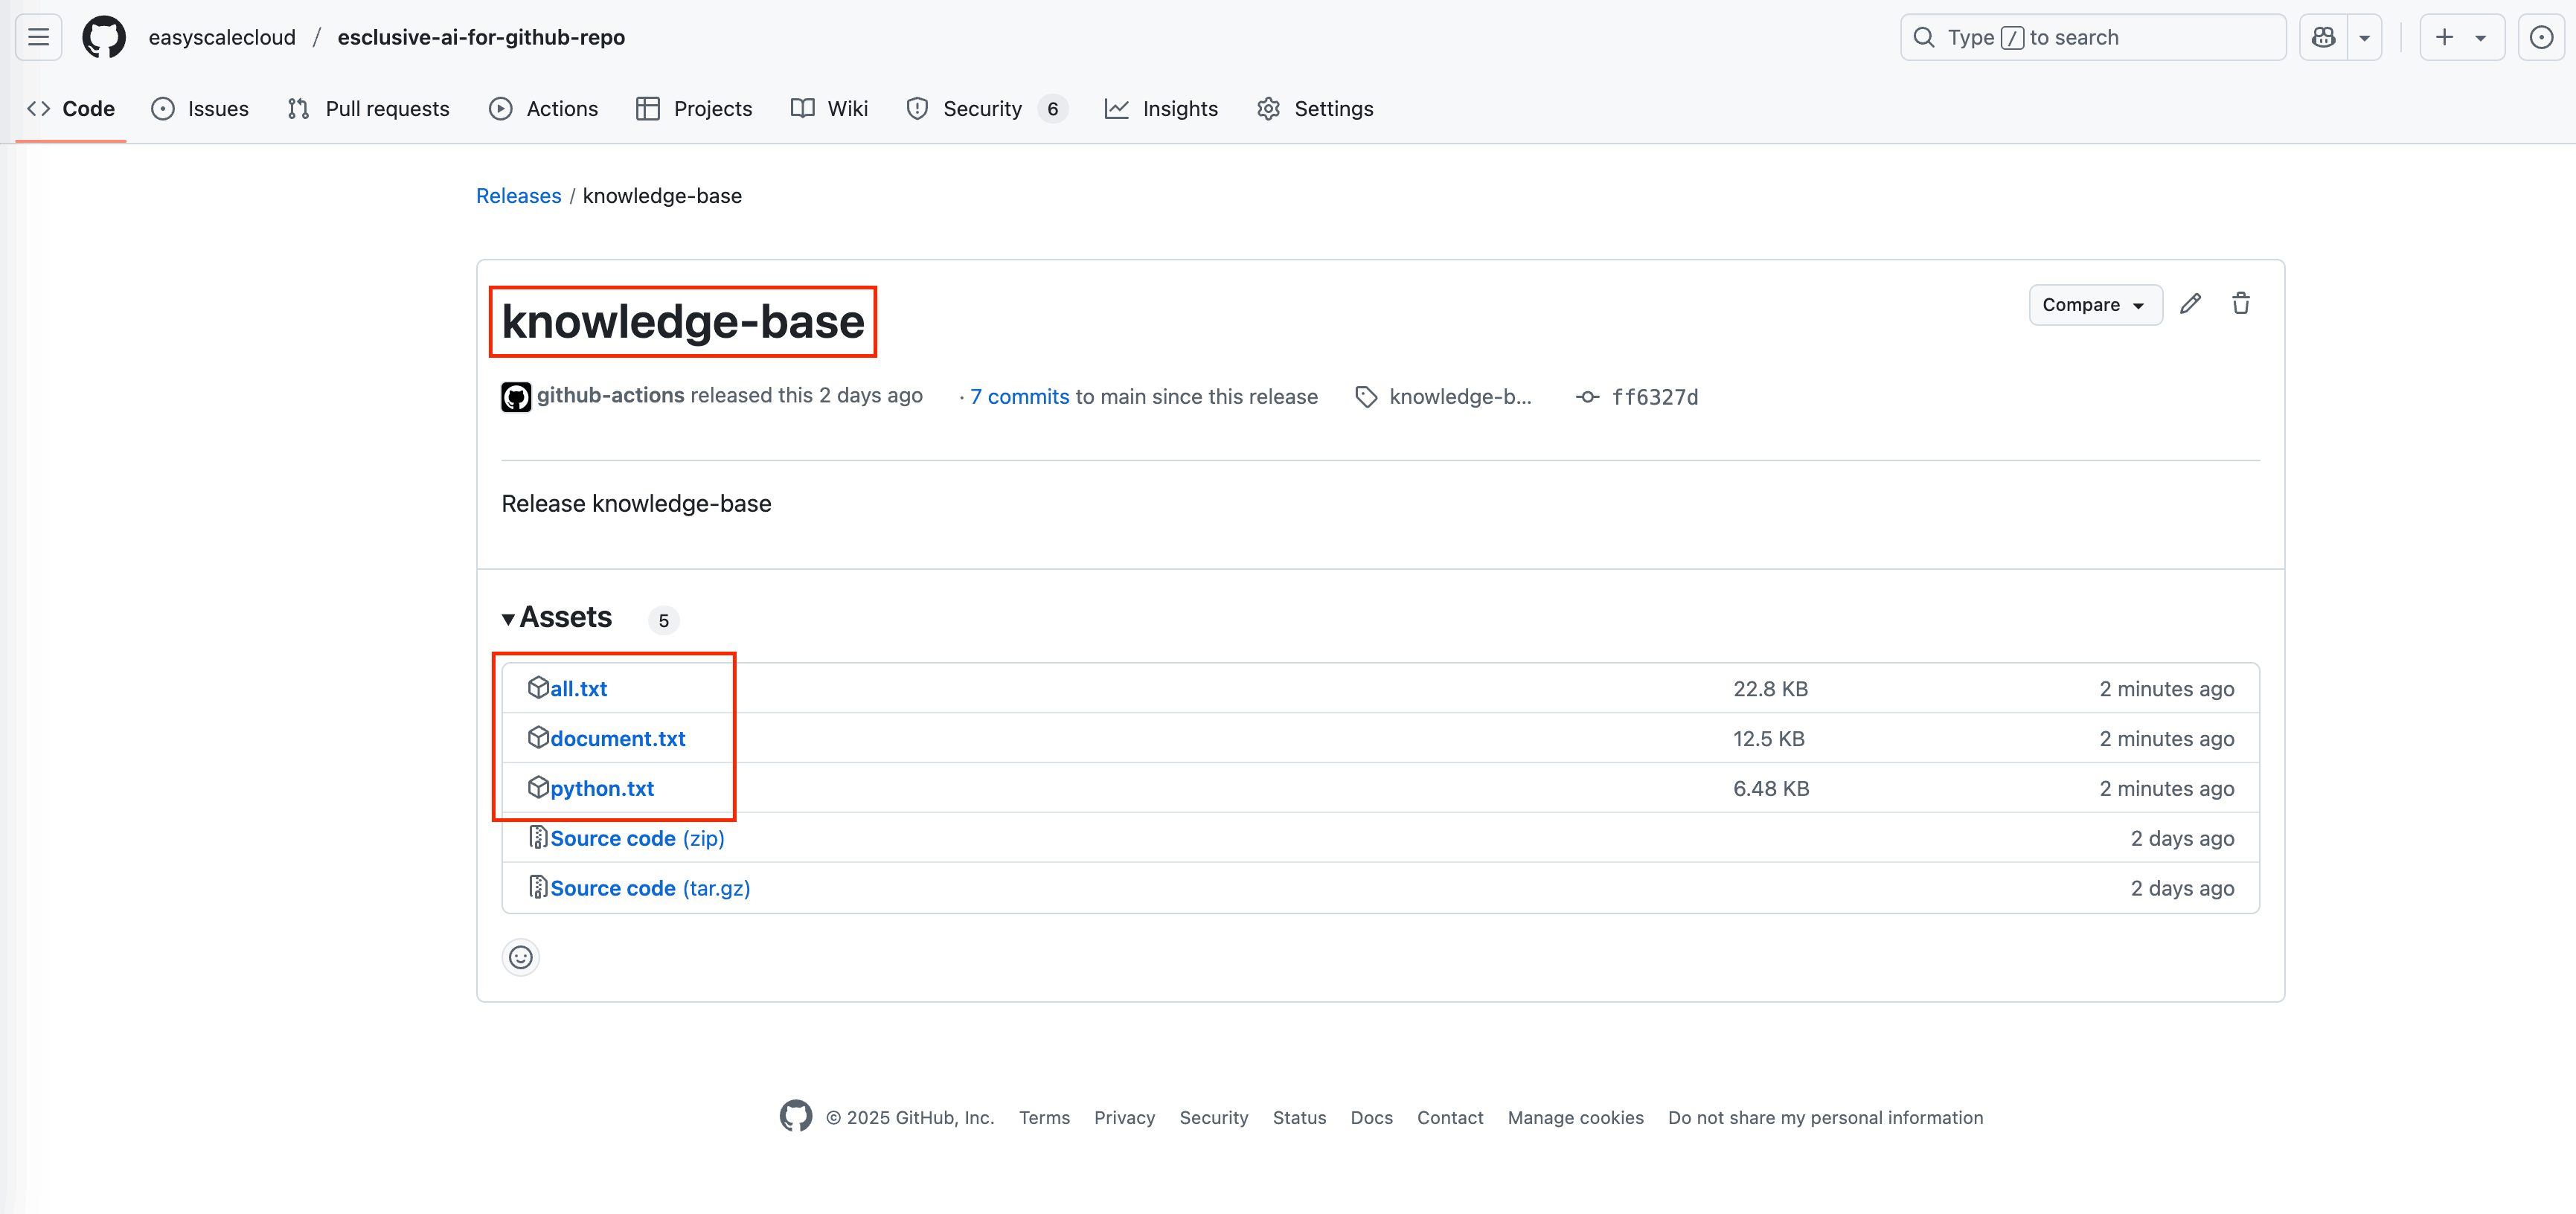
Find your knowledge base file(s) in the GitHub Release called “knowledge-base”
Each document group you defined will have its own separate downloadable file. For example, If you defined groups “all”, “python” and “document”, you’ll see three files: all.txt, python.txt, and document.txt.
🔍 Repository Setup Summary
Here’s a quick overview of the ESClusive AI for GitHub Repo setup process:
Folder Structure:
your-github-repo/
│
├── .github/
│   ├── workflows/
│   │   ├── run_esclusive_ai_for_github_repo.yml
│   │   └── esclusive_ai_for_github_repo_config.json
│   └── ...
└── ...
Setup Workflow:
- Create GitHub Action Workflow
File:
.github/workflows/run_esclusive_ai_for_github_repo.ymlDefines how and when the knowledge base generation will run
- Configure File Selection
File:
.github/workflows/esclusive_ai_for_github_repo_config.jsonSpecify which files to include or exclude in your knowledge base
Customize the scope of your AI knowledge base
- Trigger Knowledge Base Generation
Manual Trigger: Click “Run workflow” in GitHub Actions
Automatic Trigger: Uncomment push/pull_request events in the workflow file to auto-generate on code changes
Tip
💡 Pro Tip: Start with a broad file selection, then refine your configuration as you become more familiar with the tool.
🚀 Using Your AI Knowledge Base
Once downloaded, you can:
Drag and drop the file into any AI chat interface
Ask the AI detailed questions about your codebase
Request improvements that align with your existing patterns
Get onboarding help for new team members
Document your architecture automatically
💡 Pro Tips
Automatic Knowledge Base Updates
By default, you have to trigger the workflow manually in the GitHub Actions UI. But you can also configure automatic updates whenever your code changes, in your .github/workflows/run_esclusive_ai_for_github_repo.yml file:
# Choose when workflow Run: https://docs.github.com/en/actions/writing-workflows/choosing-when-your-workflow-runs/triggering-a-workflow
# Event trigger definition examples: https://docs.github.com/en/actions/writing-workflows/workflow-syntax-for-github-actions#on
on:
#  push: # any push (commit) event to master main trigger this
#    branches: ["main"]
#  pull_request: # any merged pull request to main will trigger this
#    branches: ["main"]
  workflow_dispatch: # allows you to manually trigger run job from the UI
Specify Version
If you want to use a specific version rather than the latest, do this in your .github/workflows/run_esclusive_ai_for_github_repo.yml file, where X.Y.Z is from our GitHub Release
# Specify the version of ESClusive AI for GitHub Repo by: [email protected], e.g. 0.1.1
# where X.Y.Z is from our GitHub Release: https://github.com/easyscalecloud/esclusive-ai-for-github-repo/releases
uses: easyscalecloud/esclusive-ai-for-github-repo/.github/workflows/[email protected]
# where X.Y.Z is the version you want to use, e.g. 0.1.1
🤝 Need Help?
Join our Gitter chat channel for direct support from the EasyScaleCloud team. Log in with your GitHub account and we’ll be happy to help!
Created with ❤️ by EasyScaleCloud - Making AI work for YOUR code, not just any code.